•
이미지, 오디오, 심지어 분자의 3D 구조를 생성하기 위한 최첨단 사전 훈련된 diffusion 모델을 위한 라이브러리
•
간단한 추론 솔루션을 찾고 있든, 자체 diffusion 모델을 훈련하고 싶든, Diffusers는 두 가지 모두를 지원하는 모듈식 툴박스다.
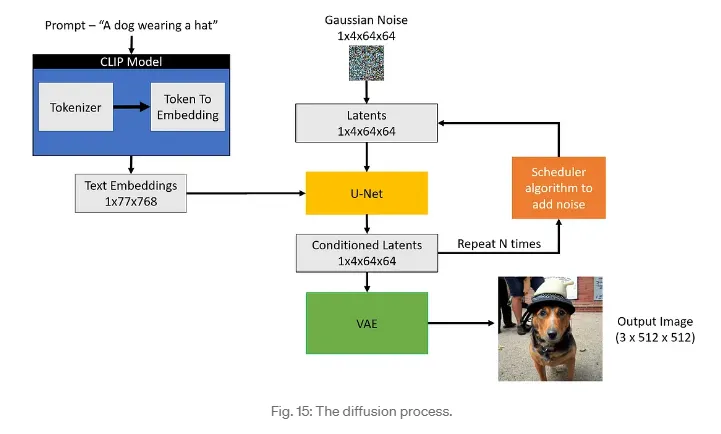
CLIP Text Encoder
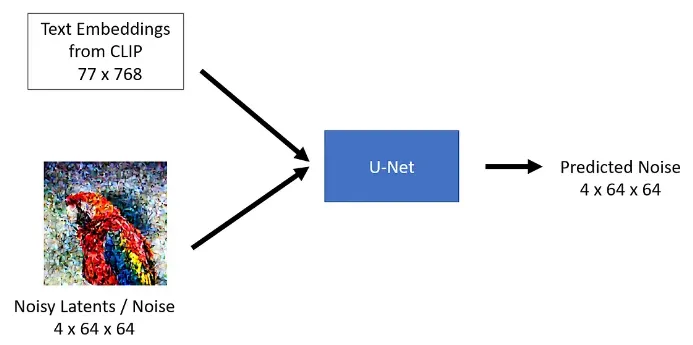
U-Net model
Scheduler
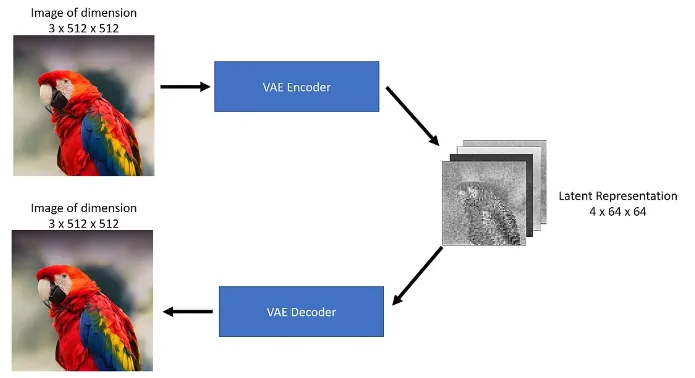
VAE Decoder
•
DiffusionPipeline 은 추론을 위해 사전 학습된 diffusion 시스템을 사용하는 가장 쉬운 방법
•
모델과 스케줄러를 포함하는 엔드 투 엔드 시스템.
•
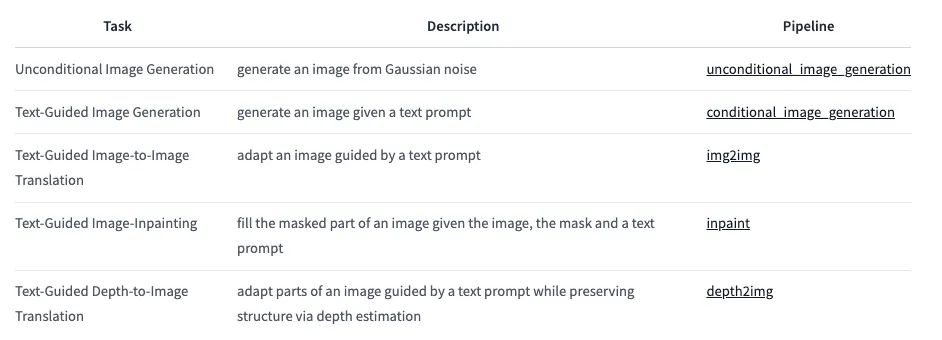
다양한 작업에 DiffusionPipeline을 바로 사용할 수 있다.
from diffusers import DiffusionPipeline
pipeline = DiffusionPipeline.from_pretrained("runwayml/stable-diffusion-v1-5")
Python
복사
◦
The DiffusionPipeline은 모든 모델링, 토큰화, 스케줄링 컴포넌트를 다운로드하고 캐시한다.
◦
Stable Diffusion Pipeline은 무엇보다도 UNet2DConditionModel과 PNDMScheduler로 구성되어 있음을 알 수 있다.
모델 구성
Model
•
대부분의 모델은 노이즈가 있는 샘플을 가져와 각 시간 간격마다 노이즈가 적은 이미지와 입력 이미지 사이의 차이인 노이즈 잔차을 예측한다.
노이즈 잔차 : 다른 모델은 이전 샘플을 직접 예측하거나 속도 또는 v-prediction을 예측하는 학습을 한다.
•
모델을 믹스 앤 매치하여 다른 diffusion 시스템을 만들 수 있다.
•
모델은 from_pretrained() 메서드로 시작되며, 이 메서드는 모델 가중치를 로컬에 캐시하여 다음에 모델을 로드할 때 더 빠르게 로드할 수 있다.
•
훑어보기에서는 고양이 이미지에 대해 학습된 체크포인트가 있는 기본적인 unconditional 이미지 생성 모델인 UNet2DModel을 로드한다.
from diffusers import UNet2DModel
repo_id = "google/ddpm-cat-256"
model = UNet2DModel.from_pretrained(repo_id)
Python
복사
모델 매개변수에 액세스하려면 model.config를 호출한다.
◦
sample_size: 입력 샘플의 높이 및 너비 치수
◦
in_channels: 입력 샘플의 입력 채널 수
◦
down_block_types 및 up_block_types: UNet 아키텍처를 생성하는 데 사용되는 다운 및 업샘플링 블록의 유형.
◦
block_out_channels: 다운샘플링 블록의 출력 채널 수. 업샘플링 블록의 입력 채널 수에 역순으로 사용되기도 한다.
◦
layers_per_block: 각 UNet 블록에 존재하는 ResNet 블록의 수
model.config
import torch
torch.manual_seed(0)
noisy_sample = torch.randn(1, model.config.in_channels, model.config.sample_size, model.config.sample_size)
noisy_sample.shape # torch.Size([1, 3, 256, 256])
with torch.no_grad():
noisy_residual = model(sample=noisy_sample, timestep=2).sample
Python
복사
•
추론을 위해 모델에 노이즈가 있는 이미지와 timestep을 전달한다.
•
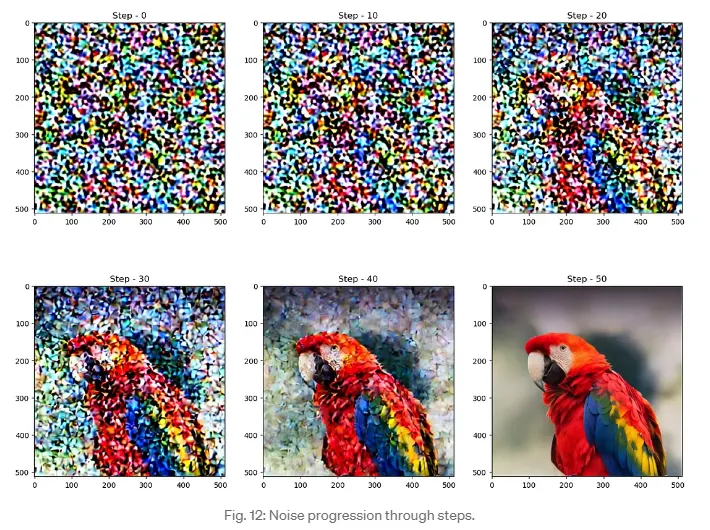
‘timestep’은 입력 이미지의 노이즈 정도를 나타내며, 시작 부분에 더 많은 노이즈가 있고 끝 부분에 더 적은 노이즈가 있다.
•
이를 통해 모델이 diffusion 과정에서 시작 또는 끝에 더 가까운 위치를 결정할 수 있다.
•
sample 메서드를 사용하여 모델 출력을 얻는다.
Scheduler
•
실제 예를 생성하려면 노이즈 제거 프로세스를 안내할 스케줄러가 필요하다.
•
스케줄러는 모델 출력이 주어졌을 때 노이즈가 많은 샘플에서 노이즈가 적은 샘플로 전환하는 것을 관리한다.
•
중요 매개변수
◦
num_train_timesteps: 노이즈 제거 프로세스의 길이, 즉 랜덤 가우스 노이즈를 데이터 샘플로 처리하는 데 필요한 타임스텝 수
◦
beta_schedule: 추론 및 학습에 사용할 노이즈 스케줄 유형
◦
beta_start 및 beta_end: 노이즈 스케줄의 시작 및 종료 노이즈 값
from diffusers import DDPMScheduler
scheduler = DDPMScheduler.from_config(repo_id)
scheduler
DDPMScheduler {
"_class_name": "DDPMScheduler",
"_diffusers_version": "0.30.3",
"beta_end": 0.02,
"beta_schedule": "linear",
"beta_start": 0.0001,
"clip_sample": true,
"clip_sample_range": 1.0,
"dynamic_thresholding_ratio": 0.995,
"num_train_timesteps": 1000,
"prediction_type": "epsilon",
"rescale_betas_zero_snr": false,
"sample_max_value": 1.0,
"steps_offset": 0,
"thresholding": false,
"timestep_spacing": "leading",
"trained_betas": null,
"variance_type": "fixed_small"
}
Python
복사
less_noisy_sample = scheduler.step(model_output=noisy_residual, timestep=2, sample=noisy_sample).prev_sample
less_noisy_sample.shape
# torch.Size([1, 3, 256, 256])
Python
복사
◦
less_noisy_sample을 다음 timestep으로 넘기면 노이즈가 더 줄어듭니다! 이제 이 모든 것을 한데 모아 전체 노이즈 제거 과정을 시각화해 보겠습니다.
먼저 노이즈 제거된 이미지를 후처리하여 PIL.Image로 표시하는 함수를 만든다.
import PIL.Image
import numpy as np
def display_sample(sample, i):
image_processed = sample.cpu().permute(0, 2, 3, 1)
image_processed = (image_processed + 1.0) * 127.5
image_processed = image_processed.numpy().astype(np.uint8)
image_pil = PIL.Image.fromarray(image_processed[0])
display(f"Image at step {i}")
display(image_pil)
Python
복사
◦
노이즈 제거 프로세스의 속도를 높이려면 입력과 모델을 GPU로 옮긴다.
model.to("cuda")
noisy_sample = noisy_sample.to("cuda")
Python
복사
◦
이제 노이즈가 적은 샘플의 잔차를 예측하고 스케줄러로 노이즈가 적은 샘플을 계산하는 노이즈 제거 루프를 생성한다.
scheduler.timesteps.shape
# torch.Size([1000])
Python
복사

