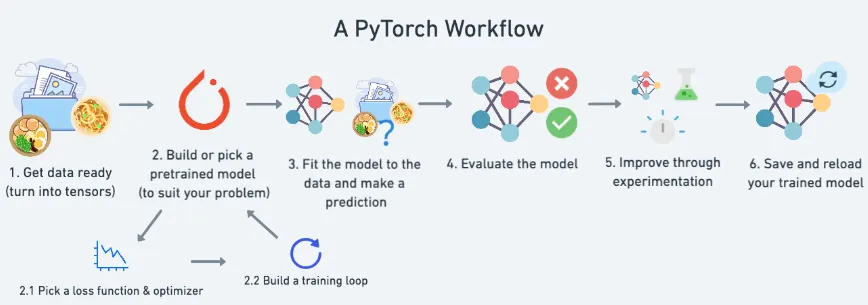
Pytorch Workflow
import torch
from torch import nn # nn contains all of PyTorch's building blocks for neural networks
import matplotlib.pyplot as plt
plt.ion()
# Check PyTorch version
> torch.__version__
2.4.0+cu121
Python
복사
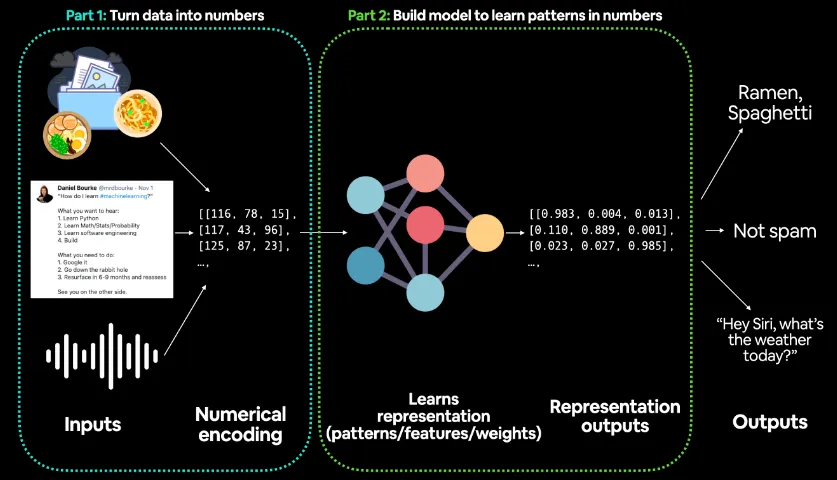
Part 1: 데이터를 숫자로 변환 (Turn data into numbers)
•
첫 번째 단계는 다양한 형태의 입력 데이터를 모델이 처리할 수 있는 숫자 형태로 변환하는 과정이다.
•
입력 데이터는 다음과 같은 형태로 들어올 수 있다:
◦
이미지 데이터: 음식 사진, 또는 다른 시각적 정보
◦
텍스트 데이터: 트윗, 뉴스 기사 등의 문장
◦
음성 데이터: 음성 명령, 대화 등
•
이러한 데이터는 각각 고유한 방식으로 **숫자 데이터(numerical encoding)**로 변환된다.
•
예를 들어:
◦
이미지의 경우, 픽셀값을 숫자로 표현할 수 있으며, 각 픽셀은 특정한 색상 값을 가진다.
◦
텍스트의 경우, 단어 또는 문장을 벡터화(벡터 임베딩)하여 숫자로 변환한다. 각 단어는 고유한 숫자 벡터로 변환되며, 이는 단어 간 유사성을 반영한다.
◦
음성 데이터는 진폭(amplitude) 값이나 주파수(frequency) 값으로 변환되어 수치 데이터로 표현된다.
•
그림에서는 이러한 입력 데이터가 숫자 배열(예: [[116, 78, 15], [117, 43, 96], [125, 87, 23]])로 변환되고 있음을 보여준다.
•
이 단계에서 중요한 것은, 모델이 학습할 수 있도록 모든 입력이 숫자로 인코딩된다는 점이다.
Part 2: 패턴을 학습하는 모델 구축 (Build model to learn patterns in numbers)
•
두 번째 단계는 딥러닝 모델이 숫자 데이터를 입력받아 패턴을 학습하는 과정이다. 그림의 중앙에는 신경망(neural network) 구조가 보이며, 이 네트워크는 데이터를 처리하고 학습한다.
•
이 과정에서 모델은 다음과 같은 작업을 수행한다:
◦
표현 학습(representation learning): 입력된 숫자 데이터를 바탕으로 패턴을 찾고, 중요한 특징(feature)을 추출한다. 이는 가중치(weights) 및 매개변수(parameters)를 학습하는 과정을 포함한다.
◦
숫자 간의 관계 학습: 다양한 레이어(layer)를 거치며, 각 데이터가 가지는 의미 있는 패턴을 파악하게 된다. 예를 들어, 음식 사진을 통해 음식의 종류를 학습하거나, 텍스트를 통해 스팸 여부를 판별하는 과정을 학습한다.
•
그림에서 출력되는 Representation outputs는 모델이 입력 데이터를 바탕으로 학습한 패턴을 바탕으로 숫자 벡터로 출력한 결과이다.
•
예시로 [(0.983, 0.004, 0.013), (0.110, 0.889, 0.001), (0.023, 0.027, 0.985)] 같은 벡터가 표현된다.
Outputs (최종 출력)
•
최종적으로 모델은 학습된 패턴을 바탕으로 결과값을 출력한다. 예를 들어:
◦
이미지 데이터의 경우, "라면", "스파게티"와 같은 음식 종류를 분류할 수 있다.
◦
텍스트 데이터의 경우, 스팸 메시지를 분류하여 "스팸 아님(Not Spam)"이라고 판단할 수 있다.
◦
음성 데이터의 경우, "Hey Siri, what’s the weather today?"와 같은 명령을 이해하여 날씨 정보를 제공하는 것처럼, 모델이 적절한 응답을 반환한다.
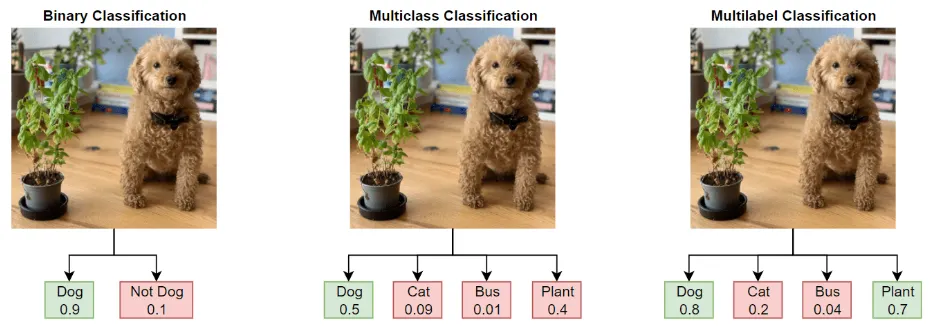
Neural Network Classification
•
Binary Classification
Target can be one of two options, e.g. yes or no
•
Multi class Classification
Target can be one of more than two options
•
Multi label Classification
Target can be assigned more than one option
Binary Classification
2.모델링 정의
모델 정의
1. 선형 모델
# 1. nn.Module을 상속받는 모델 클래스를 생성한다
class CircleModelV0(nn.Module):
def __init__(self):
super().__init__()
# 2. X와 y의 입력 및 출력 형태를 처리할 수 있는 nn.Linear 레이어 2개를 생성한다
self.layer_1 = nn.Linear(in_features=2, out_features=5) # 입력 특성 2개(X)를 받아 출력 특성 5개를 생성한다
self.layer_2 = nn.Linear(in_features=5, out_features=1) # 입력 특성 5개를 받아 출력 특성 1개(y)를 생성한다
# 3. 순전파 계산을 포함하는 forward 메서드를 정의한다
def forward(self, x):
# y와 동일한 형태의 단일 특성을 출력하는 layer_2의 출력을 반환한다
layer_1_out = self.layer_1(x)
layer_2_out = self.layer_2(layer_1_out) # layer_1을 거친 출력이 layer_2로 전달되어 계산된다
return layer_2_out
Python
복사
2. 추가 레이어 모델
class CircleModelV1(nn.Module):
def __init__(self):
super().__init__()
self.layer_1 = nn.Linear(in_features=2, out_features=10)
self.layer_2 = nn.Linear(in_features=10, out_features=10) # extra layer
self.layer_3 = nn.Linear(in_features=10, out_features=1)
def forward(self, x): # note: always make sure forward is spelt correctly!
# Creating a model like this is the same as below, though below
# generally benefits from speedups where possible.
# layer1_out = self.layer_1(x)
# layer2_out = self.layer_2(layer1_out)
# prediction = self.layer_3(layer2_out)
# return prediction
return self.layer_3(self.layer_2(self.layer_1(x)))
Python
복사
3. 추가 레이어 + 활성함수 모델 (비선형)
# 비선형 활성화 함수를 사용하여 모델을 구축한다
from torch import nn
class CircleModelV2(nn.Module):
def __init__(self):
super().__init__()
self.layer_1 = nn.Linear(in_features=2, out_features=10)
self.layer_2 = nn.Linear(in_features=10, out_features=10)
self.layer_3 = nn.Linear(in_features=10, out_features=1)
self.relu = nn.ReLU() # ReLU 활성화 함수를 추가한다
# 모델에 시그모이드를 추가할 수도 있다
# 이는 예측 시 시그모이드를 사용할 필요가 없음을 의미한다
# self.sigmoid = nn.Sigmoid()
def forward(self, x):
# 레이어 사이에 ReLU 활성화 함수를 삽입한다
out = self.layer_1(x)
out = self.relu(out)
out = self.layer_2(out)
out = self.relu(out)
out = self.layer_3(out)
return out
# return self.layer_3(self.relu(self.layer_2(self.relu(self.layer_1(x)))))
Python
복사
사전 정의
손실 함수(Loss Function) 및 옵티마이저(Optimizer)
# Create a loss function
# loss_fn = nn.BCELoss() # BCELoss = no sigmoid built-in
loss_fn = nn.BCEWithLogitsLoss() # BCEWithLogitsLoss = sigmoid built-in
# Create an optimizer
optimizer = torch.optim.SGD(params=model_0.parameters(),
lr=0.1)
Python
복사
정확도 검증 함수
# Calculate accuracy (a classification metric)
def accuracy_fn(y_true, y_pred):
# eq() -> equal를 뜻함 -> eq(y_true, y_pred) -> [true, false, flase, true ..]
# eq(y_true, y_pred).sum() -> 정답 수
# eq(y_true, y_pred).sum().item() -> python 형변환 함수
correct = torch.eq(y_true, y_pred).sum().item() # torch.eq() calculates where two tensors are equal
# 정확도 = ( 정답 수 / 전체 수 ) * 100
acc = (correct / len(y_pred)) * 100
return acc
Python
복사
3.모델 학습
원시 모델 출력에서 예측된 레이블로 전환하기
•
logits -> prediction probabilities -> prediction labels
logits : 표준 로지스틱 분포의 분위수함수, 오즈비(odds ratio)의 자연로그
# 테스트 데이터에 대한 순전파의 첫 5개 출력을 확인한다
y_logits = model_0(X_test.to(device))[:5]
# y_logits는 (배치, 예측) 형태이다
> print(y_logits.shape)
torch.Size([5, 1])
> y_logits
tensor([[-0.2079],
[-0.1507],
[-0.3872],
[-0.1570],
[-0.4334]], grad_fn=<SliceBackward0>)
Python
복사
# Use sigmoid as activate function
y_pred_probs = torch.sigmoid(y_logits)
# y_pred_probs -> (batch, prediction)
> print(y_logits.shape)
torch.Size([5, 1])
tensor([[-0.2079],
[-0.1507],
[-0.3872],
[-0.1570],
[-0.4334]], grad_fn=<SliceBackward0>)
> y_pred_probs # (5, 1)
tensor([[0.4482],
[0.4624],
[0.4044],
[0.4608],
[0.3933]], grad_fn=<SigmoidBackward0>)
Python
복사
•
y_pred_probs >= 0.5인 경우, y=1 (클래스 1)
•
y_pred_probs < 0.5이면, y=0 (클래스 0)
예측 레이블에서 예측 확률을 바꾸려면 시그모이드 활성화 함수의 출력을 반올림하면 된다.
# 예측 확률을 반올림하여 예측된 라벨을 찾는다
y_preds = torch.round(y_pred_probs)
# 불필요한 차원을 제거한다
> y_preds.squeeze() # shape : (5,)
tensor([0., 0., 0., 0., 0.], grad_fn=<SqueezeBackward0>)
Python
복사
Building a training and testing loop
# 재현성을 위해 랜덤 시드를 설정한다
torch.manual_seed(42)
# 에폭 수를 설정한다
epochs = 1000
# 학습 및 평가 루프를 구축한다
for epoch in range(epochs):
#################################################
### 학습 루프 -> 1 에폭이 실행되었다
# 1. 순전파(forward) -> 모델을 학습시킨다
# 2. 손실 함수 -> 오차를 계산한다
# 3. 역전파(Backward) -> 오차만큼 모델의 파라미터를 수정한다
#################################################
model_0.train()
# 1. 순전파를 수행한다 (모델은 원시 로짓을 출력한다)
# X_train -> (800, 2) -> (배치, 특성)
# y_logits -> (배치, 예측) -> (800, 1)
y_logits = model_0(X_train)
# y_logits -> (배치(예측),) -> (800,)
y_logits = y_logits.squeeze() # 불필요한 `1` 차원을 제거한다
# 모델과 데이터가 동일한 디바이스에 있어야 작동한다
# y_pred -> (배치(확률),) -> (800,)
y_pred = torch.round(torch.sigmoid(y_logits)) # 로짓을 확률로 변환한 후 예측 라벨로 반올림한다
# 2. 손실 및 정확도를 계산한다
# loss = loss_fn(torch.sigmoid(y_logits), # nn.BCELoss를 사용할 경우 torch.sigmoid()가 필요하다
# y_train)
# loss_fn(예측값, 실제값) -> 차이를 계산한다
loss = loss_fn(y_logits, # nn.BCEWithLogitsLoss를 사용하면 원시 로짓과 함께 작동한다
y_train)
# 정확도(accuracy_fn) = (정답 수 / 전체 수) * 100
# accuracy_fn(실제값, 예측값) -> 정확도를 계산한다
acc = accuracy_fn(y_true=y_train,
y_pred=y_pred)
# 3. 옵티마이저의 기울기를 초기화한다
optimizer.zero_grad()
# 4. 손실에 대해 역전파를 수행한다
loss.backward()
# 5. 옵티마이저를 업데이트한다
optimizer.step()
#################################################
### 테스트 루프 -> 학습 루프가 완료된 후에 실행된다
# 1. torch.inference_mode() -> 모델 파라미터를 고정시킨다 (required_grad=False)
# 2. 순전파(Forward) -> 예측은 수행하지만 학습은 하지 않는다
# -> model_0(X_test) -> (배치, 예측)
# -> model_0(X_test).squeeze() -> (배치(예측),)
# 3. 손실 함수 -> 오차를 계산한다
# -> y_test(배치(실제값),)과 test_logits(배치(예측값),)의 오차를 계산한다
# 4. 평가 -> 정확도(accuracy_fn)를 계산한다
# -> 예측값을 확률값으로 변경한다 -> torch.sigmoid(test_logits)
# -> 확률값을 이용해 이진 분류를 수행한다 -> torch.round(torch.sigmoid(test_logits))
# -> 정확도를 계산한다 -> accuracy_fn(실제값, 예측된 이진 분류)
#################################################
model_0.eval()
with torch.inference_mode():
# 1. 순전파를 수행한다
test_logits = model_0(X_test).squeeze()
# 2. 손실 및 정확도를 계산한다
test_loss = loss_fn(test_logits,
y_test)
test_pred = torch.round(torch.sigmoid(test_logits))
test_acc = accuracy_fn(y_true=y_test,
y_pred=test_pred)
# 100 에폭마다 진행 상황을 출력한다
if epoch % 100 == 0:
print(f"Epoch: {epoch} | Loss: {loss:.5f}, Accuracy: {acc:.2f}% | Test loss: {test_loss:.5f}, Test acc: {test_acc:.2f}%")
Python
복사


