사전 이해 - 소수점
양자화(Quantization)
What is 양자화(Quantization)?
•
Quantization이라는 용어가 비단 딥러닝에 국한된 것은 아니다.
•
위키피디아에 의하면, 촘촘한 값들을 듬성듬성하게 맵핑했다, 라고 대충 이해할 수 있다.
•
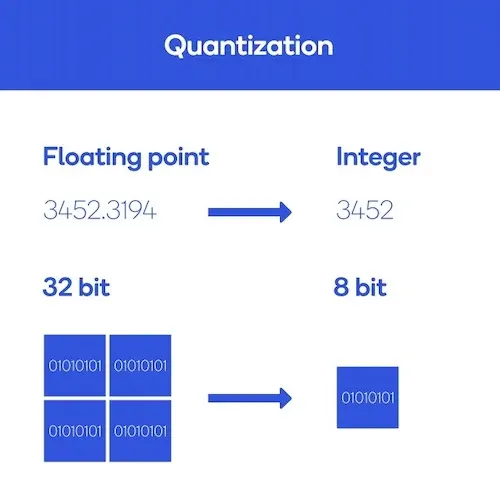
딥러닝에서는 모델의 실행 성능과 효율성을 향상을 위해 신경망의 가중치(weight)와 활성화 함수(activation function) 출력을 더 작은 비트 수로 표현하도록 변환하는 기술로 사용된다.
일상 속에서의 예시
•
누군가 현재 시간을 물어봤다고 가정하였을 때
◦
"현재 시각은 2020년 11월 29일 18시 16분 16초 460밀리초야", 라고 답변해줄 수도 있다.
◦
그러나 "18시 16분"이라고 답변해도 괜찮을 것이며, 더 나아가서는 "6시 반"이라고만 해줘도 충분할 것이다.
•
정확한 현재 시각까지 알아야 할 필요가 없을때 적당히 precision이 낮은 값을 제공하는 것, 우리는 이미 quantization을 일상 속에서 사용하고 있다.
딥러닝에서의 예시
•
딥러닝 모델의 weight과 activation를 나타내는 bit 수를 줄이는 것에 응용을 할 수 있다.
•
이렇게 bit 수를 줄일 경우 크게 두 가지 이점이 있다.
1.
데이터를 표헌하는 bit 수가 줄어들기 때문에 모델이 차지하는 메모리 공간이 작아진다.
2.
실행할 수 있는 연산의 수가 많아진다.
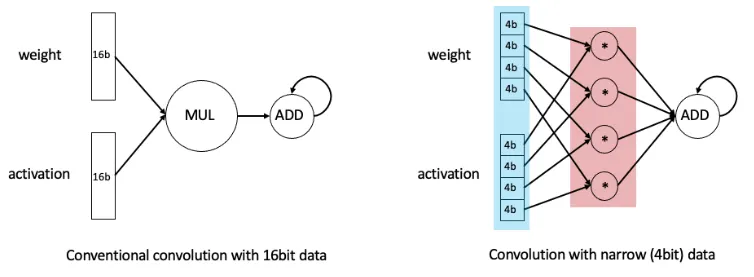
좌측(Conventional convolution with 16bit data)에서는 16bit짜리 데이터의 곱셈과 덧셈을 수행하고 있는 반면, 우측(Convolution with narrow 4bit data)에서는 4bit짜리 곱셈 네 번을 병렬적으로 수행한 뒤 덧셈을 수행하고 있다.
인풋 데이터를 표현하는 bit 수가 줄어들기 때문에, 동일한 하드웨어로 같은 시간 동안 수행할 수 있는 연산의 수가 더 많아지는 것이다.
bfloat16(Brain Floating Point Format)
•
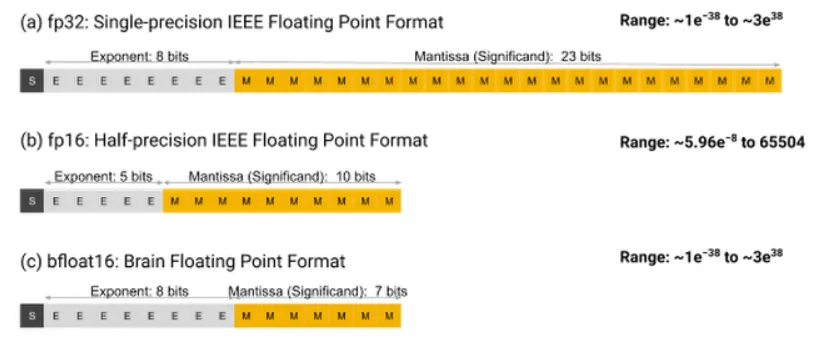
위 그림에서 볼 수 있듯이, 기존의 부동소수점 포맷인 float32는 (exponent 8bit) + (mantissa 23bit)로 구성되고, float16는 (exponent 5bit)과 (mantissa 10bit)로 구성된다.
•
그러던 중, Google Brain에서는 bfloat16(Brain Floating Point Format)라는 새로운 포맷을 제시한다.
•
bfloat16는 (exponent 8bit)를 사용함으로써 float32만큼 넓은 range를 표현하되, (mantissa 7bit)를 사용함으로써 precision을 희생하는 부동소수점 포맷이다.
•
bfloat16 포맷은 구글에 의해 개발된 이후, 구글과 인텔에서 채택되어 실제 hardware accelerator에 적용되어 왔다.
Int 8 Quantization Solutions
Google's solution
•
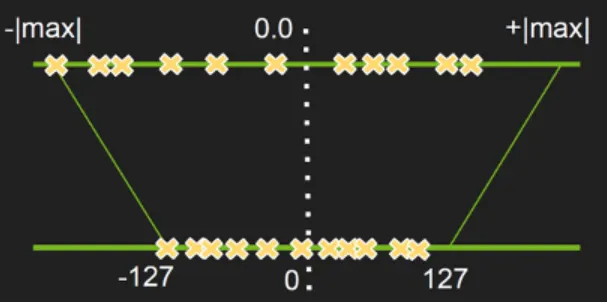
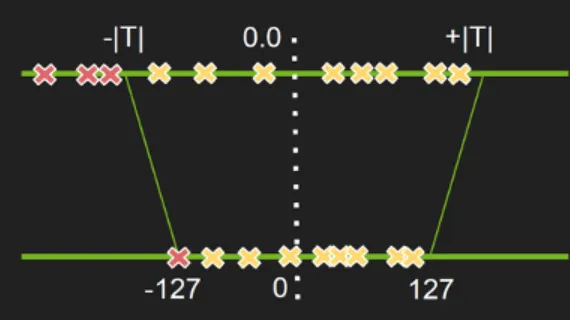
Google에서 제시한 Int 8bit solution은 위 그림 한 장으로 요약할 수 있다.
•
상단의 노란색 격자(x) 표시들이 기존의 float 데이터를 의미하고, 하단의 노란색 격자(x)표시들이 quantize된 integer 데이터를 나타낸다.
32-bit float를 8-bit integer로 변환
•
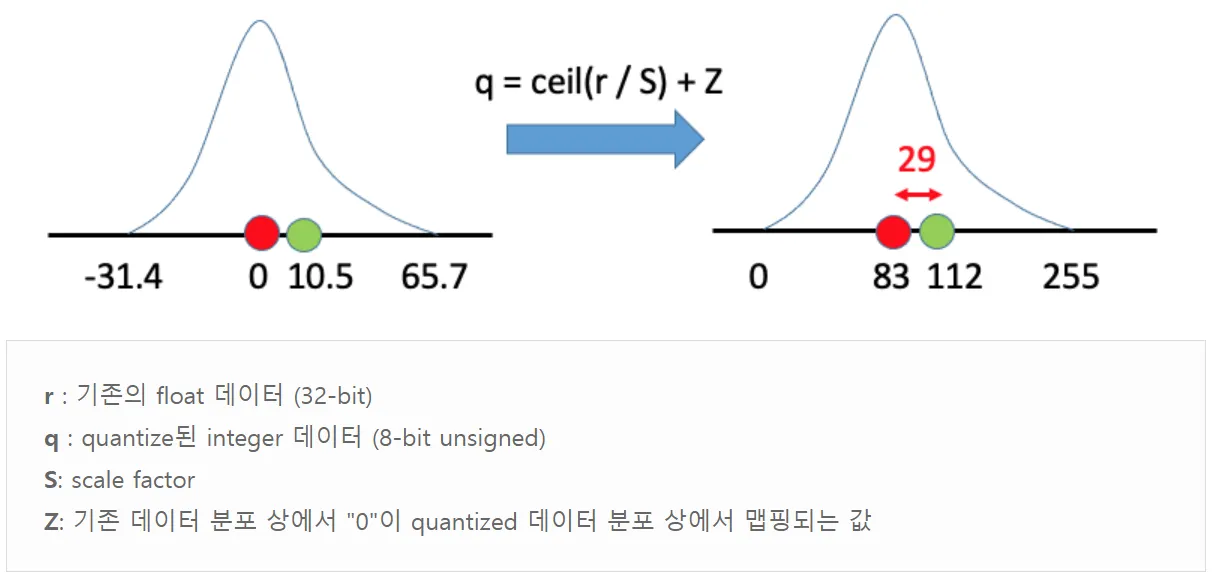
기존의 float 데이터 r이 주어졌을 때, 이를 S만큼 scale해주고 원점을 Z만큼 이동해주면 정수 데이터 q를 얻게 된다.
•
즉, S와 Z가 주어진다면 기존 분포의 데이터를 모두 quantize(양자화)시킬 수 있다.
float로 구성된 행렬의 곱셈 연산을 integer 연산으로 치환(zero-point quantization)
•
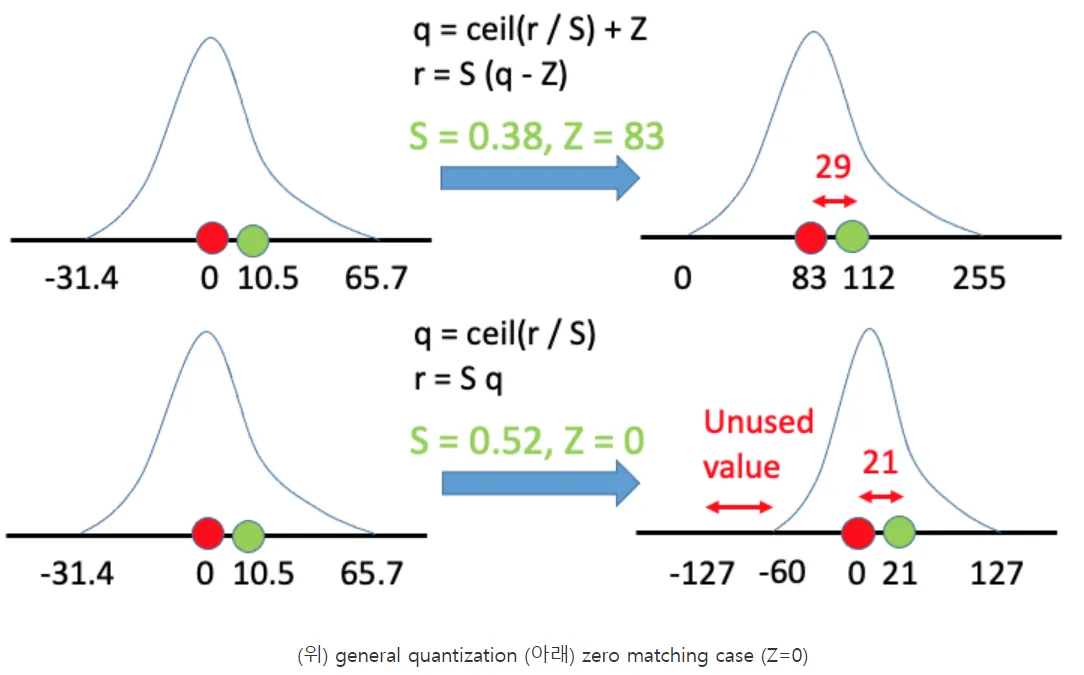
Z를 0으로 설정함으로써 연산을 더욱 간결하게 할 수 있다.
•
하지만 모든 것에는 tradeoff가 있는 법! 이러한 zero-point quantization에서는 computation이 줄어드는 만큼 accuracy도 함께 줄어드는 경향이 관찰된다.
◦
Z가 83에서 0이 되면서 두 가지 변화가 생겼다.
1.
scale factor인 S가 0.38에서 0.52로 커졌고,
2.
quantized 데이터의 분포 상에서 -127에서 -60까지의 범위는 사실상 안 활용되고 있음을 관찰할 수 있다.
◦
이러한 요인들로 인해 zero matching case에서는 정밀도(precision)가 더 낮아지는 결과가 나타났다.
◦
즉, Z=0으로 설정할 경우 혼동 행렬(matrix computation)이 가벼워지는 계산 상의 이점이 있으나, precision이 낮아진다는 trade-off가 존재한다.
trade-off : 두 마리 토끼는 어림도 없어. 한 마리의 토끼에 집중해.
•
요약
◦
기존 분포에서 절댓값이 가장 큰 값을 127(또는 -127)로 맵핑하는 것
→ - |max|와 +|max|에 대해서 -127과 127로 Scale Down한다.
Nvidia's solution
•
Google이 한 단순한 방식에서는 quantization error가 클 수 밖에 없다.
•
quantization error는 맵핑되는 기존 분포의 데이터 범위 크기에 비례한다.
•
이러한 점을 고려하여 precision을 개선하고자 한 Nvidia의 INT8 solution이다.
•
NVIDA에서 제시하는 Int 8bit solution에서는, truncation을 통해 기존 분포의 데이터 범위를 좁혀버린다.
•
특정 threshold T를 넘어서는 값들을 모두 T로 truncate시켜준 뒤, |T|~|T| 범위의 데이터를 127~127 범위로 맵핑하는 것이다.
•
이렇게 되면 기존 분포의 데이터 범위가 줄어들기 때문에, quantization error가 감소하게 된다.
•
하지만, 양 극단의 값들에서는 truncation error가 발생하게 되는데 이를테면 threshold가 "200"일 경우, "984"도 "201"도 모두 "200"으로 절삭(truncate)되기 때문이다.
•
즉 이러한 truncation error를 고려해야 하기 때문에, threshold값 T를 어떻게 정할지가 중요해진다.
◦
Threshold값 T를 어떤 값으로 설정하는 게 좋을까?
◦
쉽게 생각해서, information loss가 가장 작아지게끔 threshold 값을 설정하는게 맞다.
◦
Threshold 값의 모든 후보들에 대해 쿨백-라이블러 발산(KL divergence(기존 분포: P, quantize된 분포: Q))를 계산한 뒤 loss가 최소화되는 값으로 T를 설정하는 것이 Nvidia에서 제시한 solution이다.
•
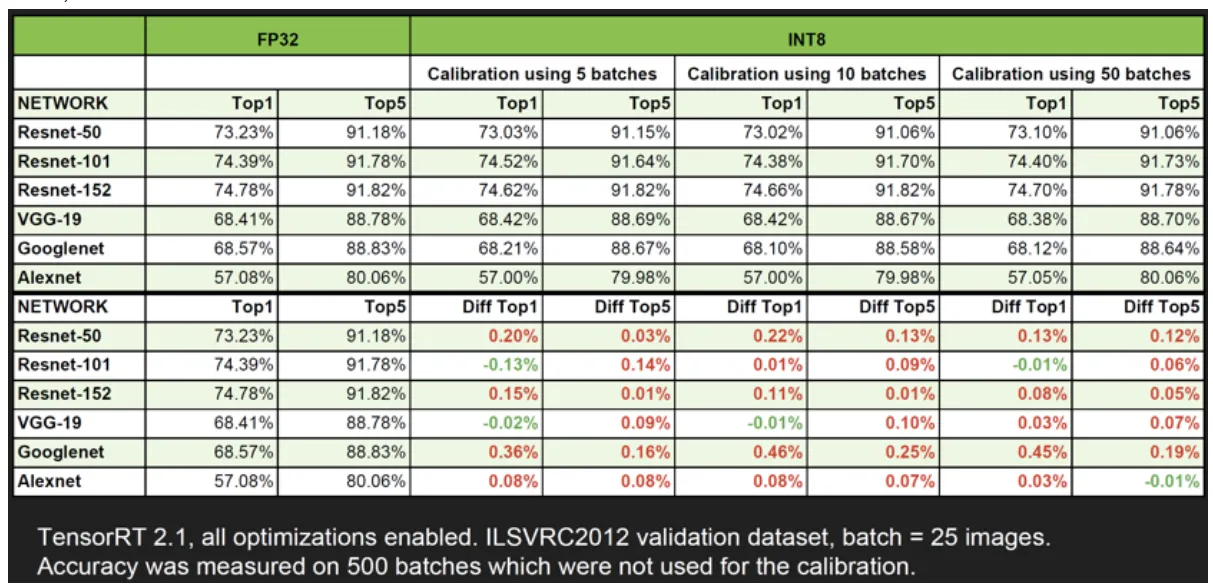
위 표에서 볼 수 있듯이, 이러한 Nvidia Int 8 solution을 적용시켜도 accuracy loss가 크지 않다는 사실을 확인할 수 있다.
설치
!pip install -q bitsandbytes>=0.39.0
!pip install -q git+https://github.com/huggingface/accelerate.git
!pip install -q git+https://github.com/huggingface/transformers.git
Python
복사
from transformers import AutoModelForCausalLM, AutoTokenizer
import torch
torch.manual_seed(0)
# Set device to CPU for now
device = 'cuda'
Python
복사
모델 정의
•
GPT-2용 모델과 토크나이저를 로드하는 것부터 시작
# Load model and tokenizer
model_id = 'gpt2'
model = AutoModelForCausalLM.from_pretrained(model_id).to(device)
tokenizer = AutoTokenizer.from_pretrained(model_id)
# Print model size
# get_memory_footprint : 모델이 차지하고 있는 메모리 공간을 나타내준다.
> print(f"Model size: {model.get_memory_footprint():,} bytes")
Model size: 510,342,192 bytes
Python
복사
양자화 정의
•
해당 섹션에서는 절대 최대 양자화(Absmax Quantization)를 사용하는 대칭형 양자화와 영점 양자화(Zero point Quantization)를 사용하는 비대칭형이라는 두 가지 양자화 기술을 구현
def absmax_quantize(X):
# Calculate scale
scale = 127 / torch.max(torch.abs(X))
# Quantize
X_quant = (scale * X).round()
# Dequantize
X_dequant = X_quant / scale
return X_quant.to(torch.int8), X_dequant
Python
복사
def zeropoint_quantize(X):
# Calculate value range (denominator)
x_range = torch.max(X) - torch.min(X)
x_range = 1 if x_range == 0 else x_range
# Calculate scale
scale = 255 / x_range
# Shift by zero-point
zeropoint = (-scale * torch.min(X) - 128).round()
# Scale and round the inputs
X_quant = torch.clip((X * scale + zeropoint).round(), -128, 127)
# Dequantize
X_dequant = (X_quant - zeropoint) / scale
return X_quant.to(torch.int8), X_dequant
Python
복사
◦
다음 단계는 영점 및 절대값 양자화를 사용하여 가중치를 양자화하는 것으로 구성
◦
다음 예에서는 이러한 기술을 GPT-2의 첫 번째 주의 계층에 적용하여 결과를 확인
# Extract weights of the first layer
weights = model.transformer.h[0].attn.c_attn.weight.data
print("Original weights:")
print(weights)
# 정가운데가 0이냐 아니냐.
# Quantize layer using absmax quantization
weights_abs_quant, _ = absmax_quantize(weights)
print("\nAbsmax quantized weights:")
print(weights_abs_quant)
# Quantize layer using| absmax quantization
weights_zp_quant, _ = zeropoint_quantize(weights)
print("\nZero-point quantized weights:")
print(weights_zp_quant)
Python
복사
Original weights:
tensor([[-0.4738, -0.2614, -0.0978, ..., 0.0513, -0.0584, 0.0250],
[ 0.0874, 0.1473, 0.2387, ..., -0.0525, -0.0113, -0.0156],
[ 0.0039, 0.0695, 0.3668, ..., 0.1143, 0.0363, -0.0318],
...,
[-0.2592, -0.0164, 0.1991, ..., 0.0095, -0.0516, 0.0319],
[ 0.1517, 0.2170, 0.1043, ..., 0.0293, -0.0429, -0.0475],
[-0.4100, -0.1924, -0.2400, ..., -0.0046, 0.0070, 0.0198]],
device='cuda:0')
Absmax quantized weights:
tensor([[-21, -12, -4, ..., 2, -3, 1],
[ 4, 7, 11, ..., -2, -1, -1],
[ 0, 3, 16, ..., 5, 2, -1],
...,
[-12, -1, 9, ..., 0, -2, 1],
[ 7, 10, 5, ..., 1, -2, -2],
[-18, -9, -11, ..., 0, 0, 1]], device='cuda:0',
dtype=torch.int8)
Zero-point quantized weights:
tensor([[-20, -11, -3, ..., 3, -2, 2],
[ 5, 8, 12, ..., -1, 0, 0],
[ 1, 4, 18, ..., 6, 3, 0],
...,
[-11, 0, 10, ..., 1, -1, 2],
[ 8, 11, 6, ..., 2, -1, -1],
[-18, -8, -10, ..., 1, 1, 2]], device='cuda:0',
dtype=torch.int8)
Python
복사
양자화 모델에 적용하기
•
PyTorch는 기본적으로 INT8 행렬 곱셈을 허용하지 않는다.
•
실제 시나리오에서는 모델을 실행하기 위해 이를 역양자화하고(예: FP16에서) INT8로 저장
•
다음 섹션에서는 bitsandbytes라이브러리를 사용하여 이 문제를 해결해 보자.
import numpy as np
from copy import deepcopy
# Store original weights
weights = [param.data.clone() for param in model.parameters()]
# Create model to quantize
model_abs = deepcopy(model)
# Quantize all model weights
weights_abs = []
for param in model_abs.parameters():
_, dequantized = absmax_quantize(param.data)
param.data = dequantized
weights_abs.append(dequantized)
# Create model to quantize
model_zp = deepcopy(model)
# Quantize all model weights
weights_zp = []
for param in model_zp.parameters():
_, dequantized = zeropoint_quantize(param.data)
param.data = dequantized
weights_zp.append(dequantized)
Python
복사
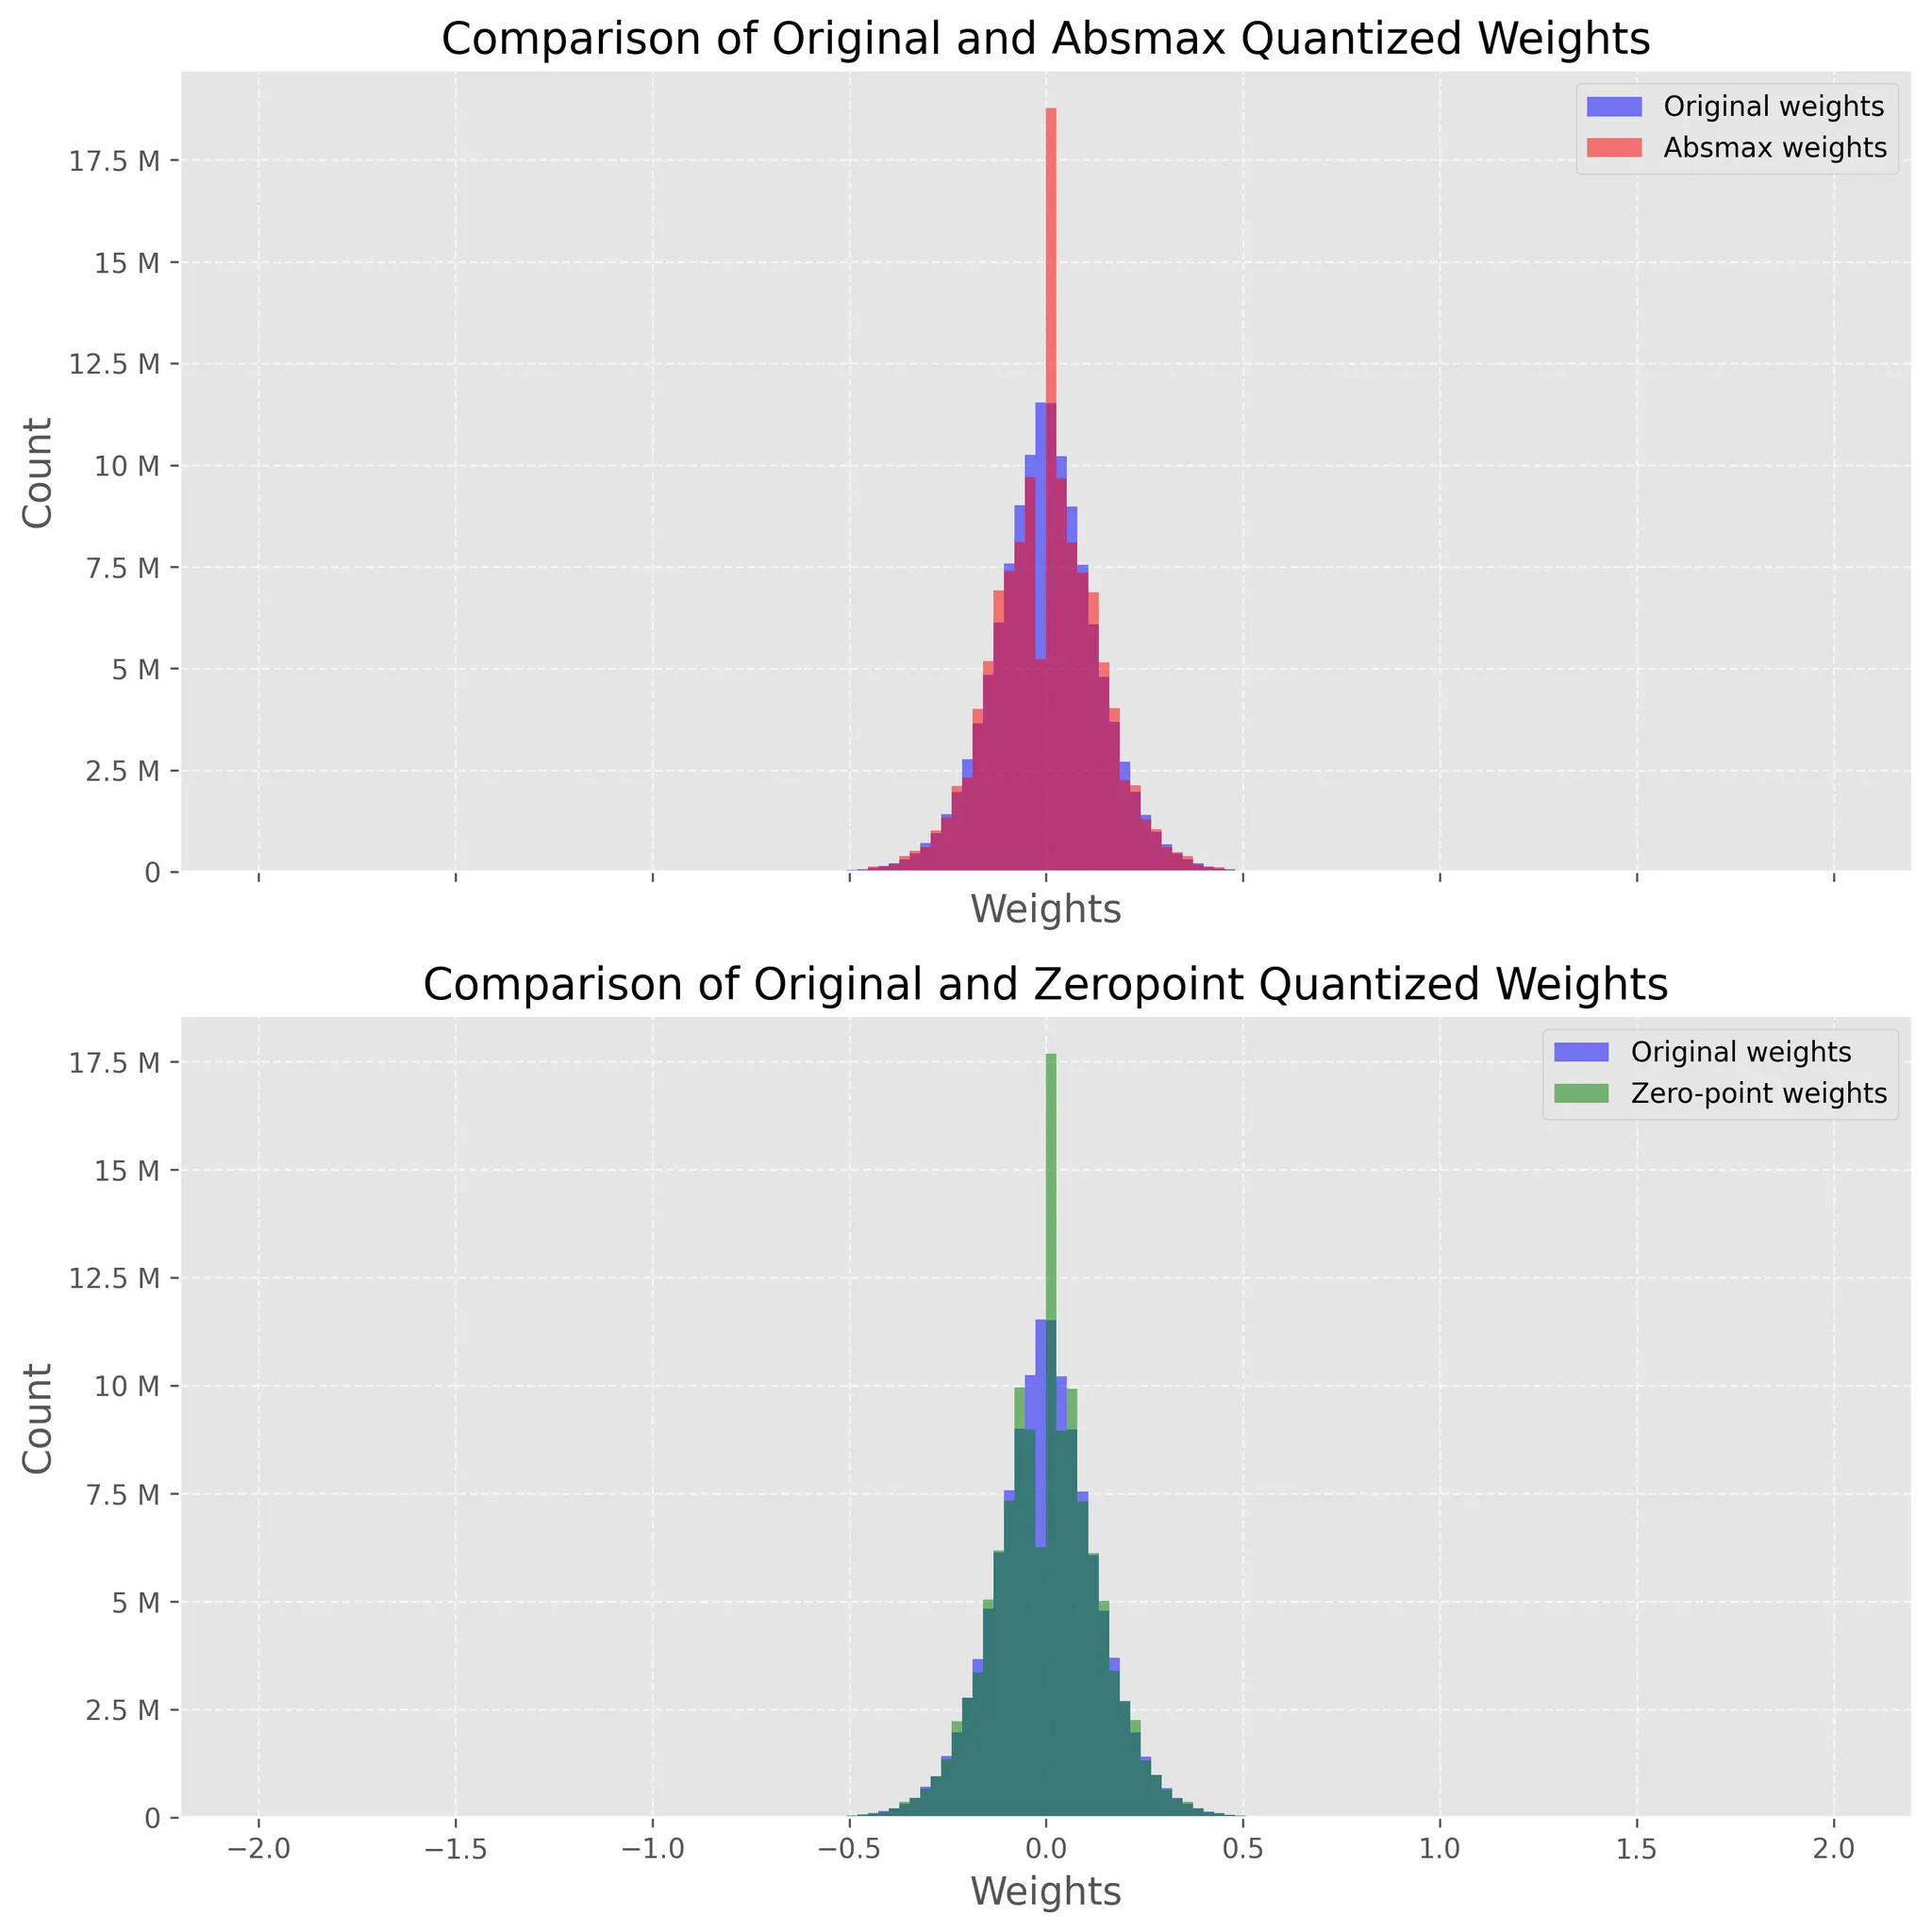
히스토그램으로 확인
•
이제 모델이 양자화되었으므로 이 프로세스의 영향을 확인하고 싶습니다.
•
직관적으로 우리는 양자화된 가중치가 원래 가중치에 가까운 지 확인하고 싶습니다.
•
이를 확인하는 시각적 방법은 역양자화된 가중치와 원래 가중치의 분포를 플롯하는 것입니다.
•
양자화가 손실되면 무게 분포가 크게 변경됩니다.
import matplotlib.pyplot as plt
import matplotlib.ticker as ticker
# Flatten weight tensors
weights = np.concatenate([t.cpu().numpy().flatten() for t in weights])
weights_abs = np.concatenate([t.cpu().numpy().flatten() for t in weights_abs])
weights_zp = np.concatenate([t.cpu().numpy().flatten() for t in weights_zp])
# Set background style
plt.style.use('ggplot')
# Create figure and axes
fig, axs = plt.subplots(2, figsize=(10,10), dpi=300, sharex=True)
# Plot the histograms for original and zero-point weights
axs[0].hist(weights, bins=150, alpha=0.5, label='Original weights', color='blue', range=(-2, 2))
axs[0].hist(weights_abs, bins=150, alpha=0.5, label='Absmax weights', color='red', range=(-2, 2))
# Plot the histograms for original and absmax weights
axs[1].hist(weights, bins=150, alpha=0.5, label='Original weights', color='blue', range=(-2, 2))
axs[1].hist(weights_zp, bins=150, alpha=0.5, label='Zero-point weights', color='green', range=(-2, 2))
# Add grid
for ax in axs:
ax.grid(True, linestyle='--', alpha=0.6)
# Add legend
axs[0].legend()
axs[1].legend()
# Add title and labels
axs[0].set_title('Comparison of Original and Absmax Quantized Weights', fontsize=16)
axs[1].set_title('Comparison of Original and Zeropoint Quantized Weights', fontsize=16)
for ax in axs:
ax.set_xlabel('Weights', fontsize=14)
ax.set_ylabel('Count', fontsize=14)
ax.yaxis.set_major_formatter(ticker.EngFormatter()) # Make y-ticks more human readable
# Improve font
plt.rc('font', size=12)
plt.tight_layout()
plt.show()
Python
복사
모델 예측
def generate_text(model, input_text, max_length=50):
input_ids = tokenizer.encode(input_text, return_tensors='pt').to(device)
output = model.generate(inputs=input_ids,
max_length=max_length,
do_sample=True,
top_k=30,
pad_token_id=tokenizer.eos_token_id,
attention_mask=input_ids.new_ones(input_ids.shape))
return tokenizer.decode(output[0], skip_special_tokens=True)
# Generate text with original and quantized models
original_text = generate_text(model, "I have a dream")
absmax_text = generate_text(model_abs, "I have a dream")
zp_text = generate_text(model_zp, "I have a dream")
print(f"Original model:\n{original_text}")
print("-" * 50)
print(f"Absmax model:\n{absmax_text}")
print("-" * 50)
print(f"Zeropoint model:\n{zp_text}")
Python
복사
모델 평가
•
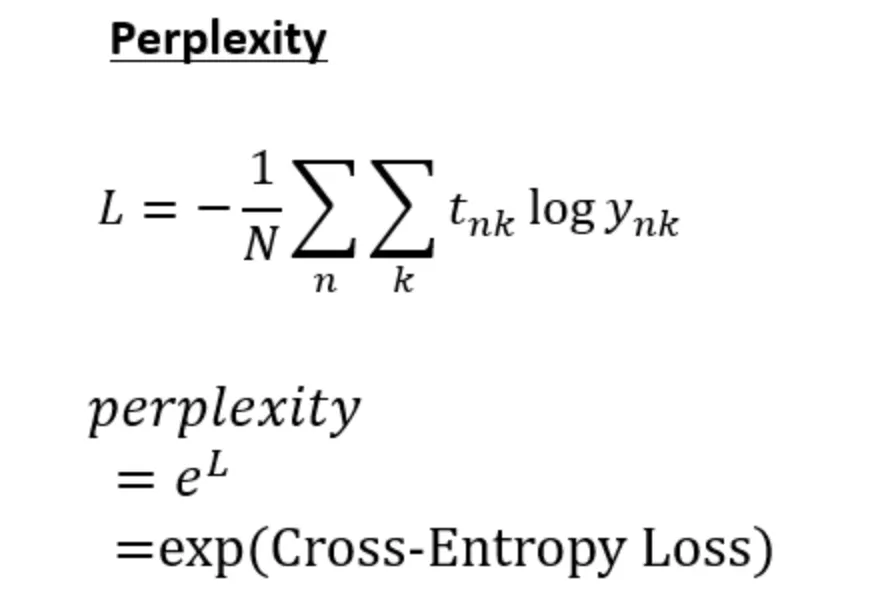
자연어 처리(NLP)에서 확률적 또는 통계적 모델의 품질을 평가하는데 사용되는 척도
•
Perplexity 점수가 낮을수록 모델이 샘플을 예측하는 데 더 나은 것으로 간주된다.
•
Perplexity는 모델이 예측을 할 때 얼마나 당황하거나 혼란을 겪는지를 측정
•
이는 모델에 따른 테스트 세트의 엔트로피(또는 평균 로그 가능도, average log-likelihood)의 지수로 계산
•
언어 모델의 경우, 이는 본질적으로 모델이 다음 토큰(예: 문장에서의 단어)을 예측할 때 평균적으로 가지고 있다고 생각하는 선택의 수(the average number of choices), 분기 수(number of branches)를 평가하는 것을 의미
•
수식
◦
N: 총 데이터 개수
◦
t_nk: n개째 데이터의 k번째 값 (정답이면 1, 정답이 아니면 0)
◦
y_nk: 모델이 예측한 확률값 (0~1 사이의 실수 값)
def calculate_perplexity(model, text):
# Encode the text
encodings = tokenizer(text, return_tensors='pt').to(device)
# Define input_ids and target_ids
input_ids = encodings.input_ids
target_ids = input_ids.clone()
with torch.no_grad():
outputs = model(input_ids, labels=target_ids)
# Loss calculation
neg_log_likelihood = outputs.loss
# Perplexity calculation
ppl = torch.exp(neg_log_likelihood)
return ppl
ppl = calculate_perplexity(model, original_text)
ppl_abs = calculate_perplexity(model_abs, absmax_text)
ppl_zp = calculate_perplexity(model_zp, absmax_text)
print(f"Original perplexity: {ppl.item():.2f}")
print(f"Absmax perplexity: {ppl_abs.item():.2f}")
print(f"Zeropoint perplexity: {ppl_zp.item():.2f}")
Python
복사
Original perplexity: 7.59
Absmax perplexity: 21.52
Zeropoint perplexity: 18.08
Python
복사

